There are a lot of new features and changes to old features in Windows 11. If you want to get the best experience, you need to customize its settings optimally.
At first glance, I personally found Windows 11 to be perfect right out of the box, unlike Windows 10, which forced me to take on a «welcome to the future» persona. However, as I tinkered with the settings and features, I realized that there were many things that could be improved by changing the default settings.
There are many things you can do to optimize your Windows 11 experience, such as setting up new features, removing unnecessary obstacles, and taking advantage of new options added to older features.
Here are the different ways to adjust the Windows 11 settings for the best experience.
Adjusting Windows Update options
To ensure security and stability, it is necessary to keep your PC up-to-date. However, it is equally important to set up Windows Update. If you reboot at the wrong time, you can lose hours of work, or worse, lose the ability to fight bosses in your favorite MMO/s.
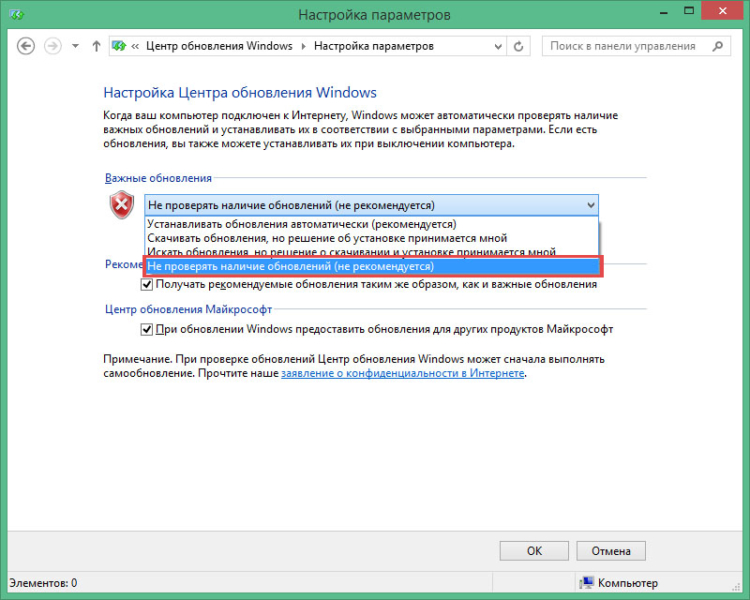
Open Settings from the Start menu and select Windows Update at the bottom of the left panel. Here you will find downloadable updates and pause/resume updates. The more important item here is «Advanced Options», so click on it.
Here you can set the time of day when you do not want to reboot your PC, manage update notifications, and how you want to download updates. These settings can be fine-tuned as needed, but it is recommended to disable the «Stay up to date» option and enable notifications before rebooting. Otherwise, right after downloading the update, your PC will reboot without prior notification.
Enable Dark Mode
By default, Windows 11 uses a light mode with a very bright theme. If you prefer a dark screen or work in a dark environment and the bright theme is hard on your eyes, you can switch to dark mode. Here’s how to do it.
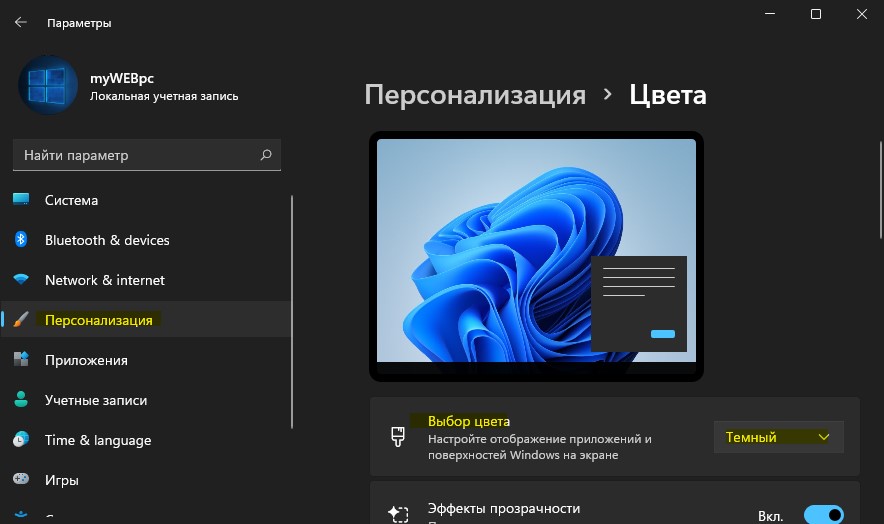
Open «Windows Settings» again and click on «Personalization» and then «Colors».
At the top, in the Select a mode section, select Dark.
Windows will darken and the dark mode will be automatically enabled for supported apps.
Select Power Mode
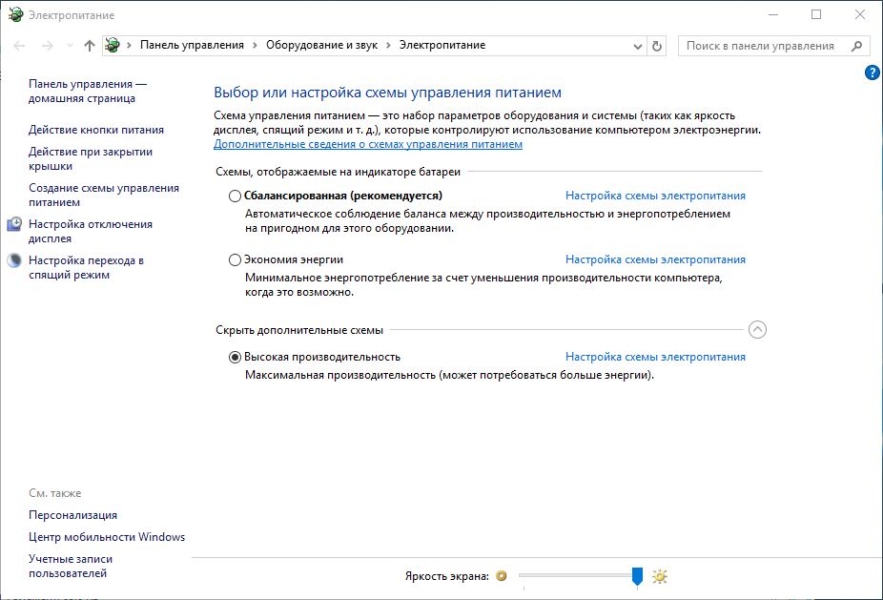
Whether you use Windows 11 or any other version, you need to manage the power consumption of Windows. By default, it is set to balanced mode. However, your preference may vary depending on whether you want to improve performance or conserve power.
In Windows 11 settings, select the «System» option, click on «Power» and select the correct power mode.
In the Power Mode section, you can choose from «Best Power Efficiency», «Balanced», and «Best Performance» as your preferred power profile.
Adding a Folder to the Start Menu

The Start menu in Windows 11 is much simpler than in Windows 10, and some features have been removed. However, the ability to add pre-defined folders as small icons to the Start menu has been added. This includes folders such as Downloads, Documents, Pictures, and User Folders.
To add a folder to the Start menu, click on «Personalization» in the Windows 11 settings and select «Start».
If you select the «Folders» option here, you will see a lot of pre-defined folders with a toggle button next to them. Enable the ones you want to appear in the Start menu, and you will see their icons next to the power button.
Customize the Taskbar
The taskbar in Windows 11 is completely new and behaves differently from previous Windows versions. Thankfully, you won’t be bothered by the new changes in Windows 11, as you can completely customize it to your liking. You can remove fixed icons, move icons to the left side, hide or unhide the taskbar, and much more.
For more information on how to fully customize the Windows 11 taskbar to your liking, please see our guide on How to Customize the Windows 11 Taskbar.
Disable Windows 11 ads
Microsoft has cleverly introduced advertisements that appear as tips or as product recommendations in various places in Windows 11. If you don’t want to see ads, here’s how to disable them in different areas of Windows 11.
Disabling Ads in Settings App
Open «Settings» from the Start menu and click on «Privacy and Security» in the left panel.
Now click on «General» and disable the «Show recommended content» option in the «Settings» app.
Disable ads displayed in File Explorer
In File Explorer, click on the three dots menu at the top and select «Options» from it.
In the «Folder Options» window, go to the «View» tab and uncheck the «Show sync provider notifications» option.
Disabling Ads in File Explorer
In Windows Settings, click System, and then click Notifications.
Scroll to the bottom and disable the options «Provide suggestions on how to configure the device» and «Show tips and suggestions when using Windows».
Manage Notifications
It is recommended that you customize your notifications so that you are not disturbed by unnecessary notifications or by Microsoft’s instructions to try different apps. To do so, go to the Settings app, click on the System option, and then click on Notifications.
Besides the option to disable notifications altogether, you will see a list of apps that can show notifications. Here, you can disable notifications for individual apps completely or control how notifications are displayed.
Don’t forget to disable the suggestion notifications at the bottom as we did above to prevent ads and suggestions from appearing in the notifications.
Disable Unnecessary Visual Effects
I personally disable animations and extra effects in any version of Windows. This is to improve the performance of Windows and provide a quicker experience since you don’t have to wait for animations.
This is not to say that you should disable all visual effects, but try to balance performance and appearance.
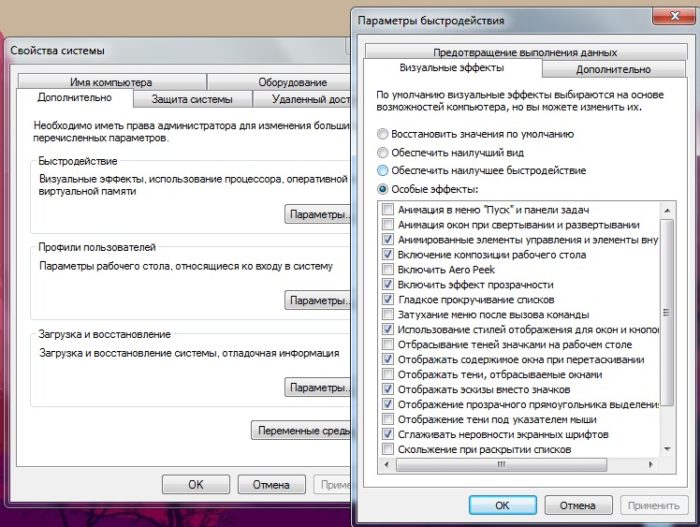
The Settings app in Windows 11 provides a button to disable most animations, but we recommend using the Performance Options window where you have full control.
In Windows search, type advanced and select «Show advanced system settings».
Next, in the Performance section, click Settings.
You will now see a list of all the visual effects that can be disabled/enabled. You can disable these effects one by one and decide which ones you want to enable. If there is no noticeable difference in the interface and you are looking for pure performance, you can still use the settings shown in the screenshot below.