Recently, the Android x86 project happened important event — released version Release Candidate 1 for Android 6.0 Marshmallow operating system. This means that the latest version of Android is now available for installation on computers and laptops. In this article, we’ll show you how to install Android 6.0 Marshmallow on your computer, as well as how to set up and better use this system on the full computer.
How to install Android 6.0 next to the other OS?
To install Android 6.0 Marshmallow x86 RC1 on your computer or laptop you need to follow a fairly simple instructions. Writing the image to disk or USB-drive:
- Download the ISO-image systems on the official website — 32-bit and 64-bit.
- The image can be written to disk in a standard way via CD Burner XP to Windows applications, either with a standard utility in Windows 7 and above. If you do not want to spend the extra drive, you can create a bootable USB:
- It is better to use the application Linux Live USB Creator (LiLi), which can be downloaded for Windows and Linux on the official site of the project.
- Run the utility to in paragraph 1, select the USB-drive on which you want to install Android.
- Select the very image you downloaded earlier.
- Ignoring all the settings, click on the zipper in paragraph 5, and then begin recording the image on a USB-drive.
Installation of the system:
- Prepare a partition on the drive for Android. For partitioning it is better to use package Acronis Disc Director Suite software. New Android x86 version allows you to install the system near other OS without damaging it. Therefore, you even can not worry about the partition if you do not want too much bother.
- By the end of the image recording on USB-drive, if there were no errors, restart your laptop. After switching on and appears on the manufacturer’s logo appears periodically press a button that brings up a window with alternative ways to download.
- In the alternative start, select USB, CD-ROM or a DVD-on which you have installed Android.
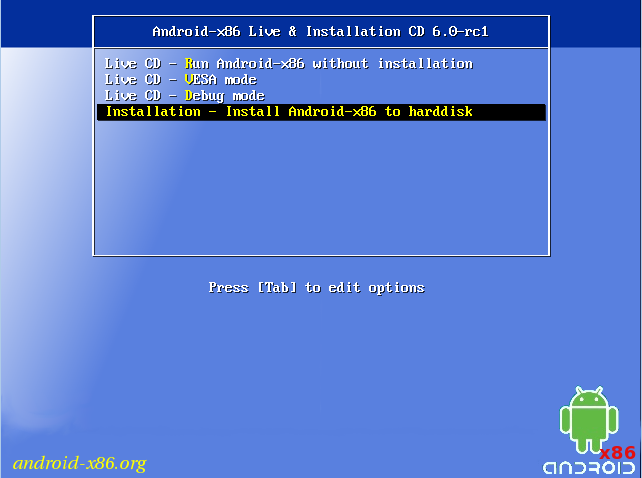
- Then you will see a window with four options. The first three allow you to run Android in Live CD mode or Live USB — work directly from the disk system. The last option starts the installation.
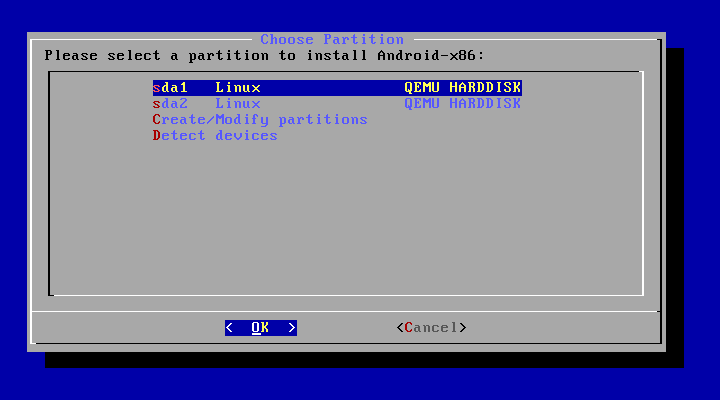
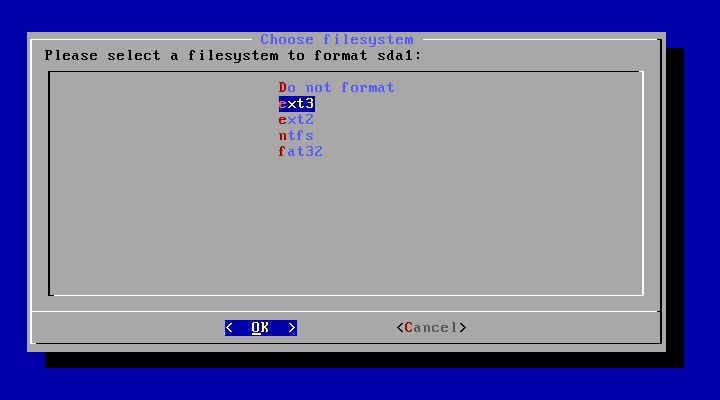
- Next, you will choose partition to install Android. You can choose any supported partition, format it, or install the Android system next to the other. In the latter case, select the option «Do Not Format» instead of the name of the file system. If you decide to install the system on a clean partition, choose a filesystem (recommended ext3 or ext4).
-
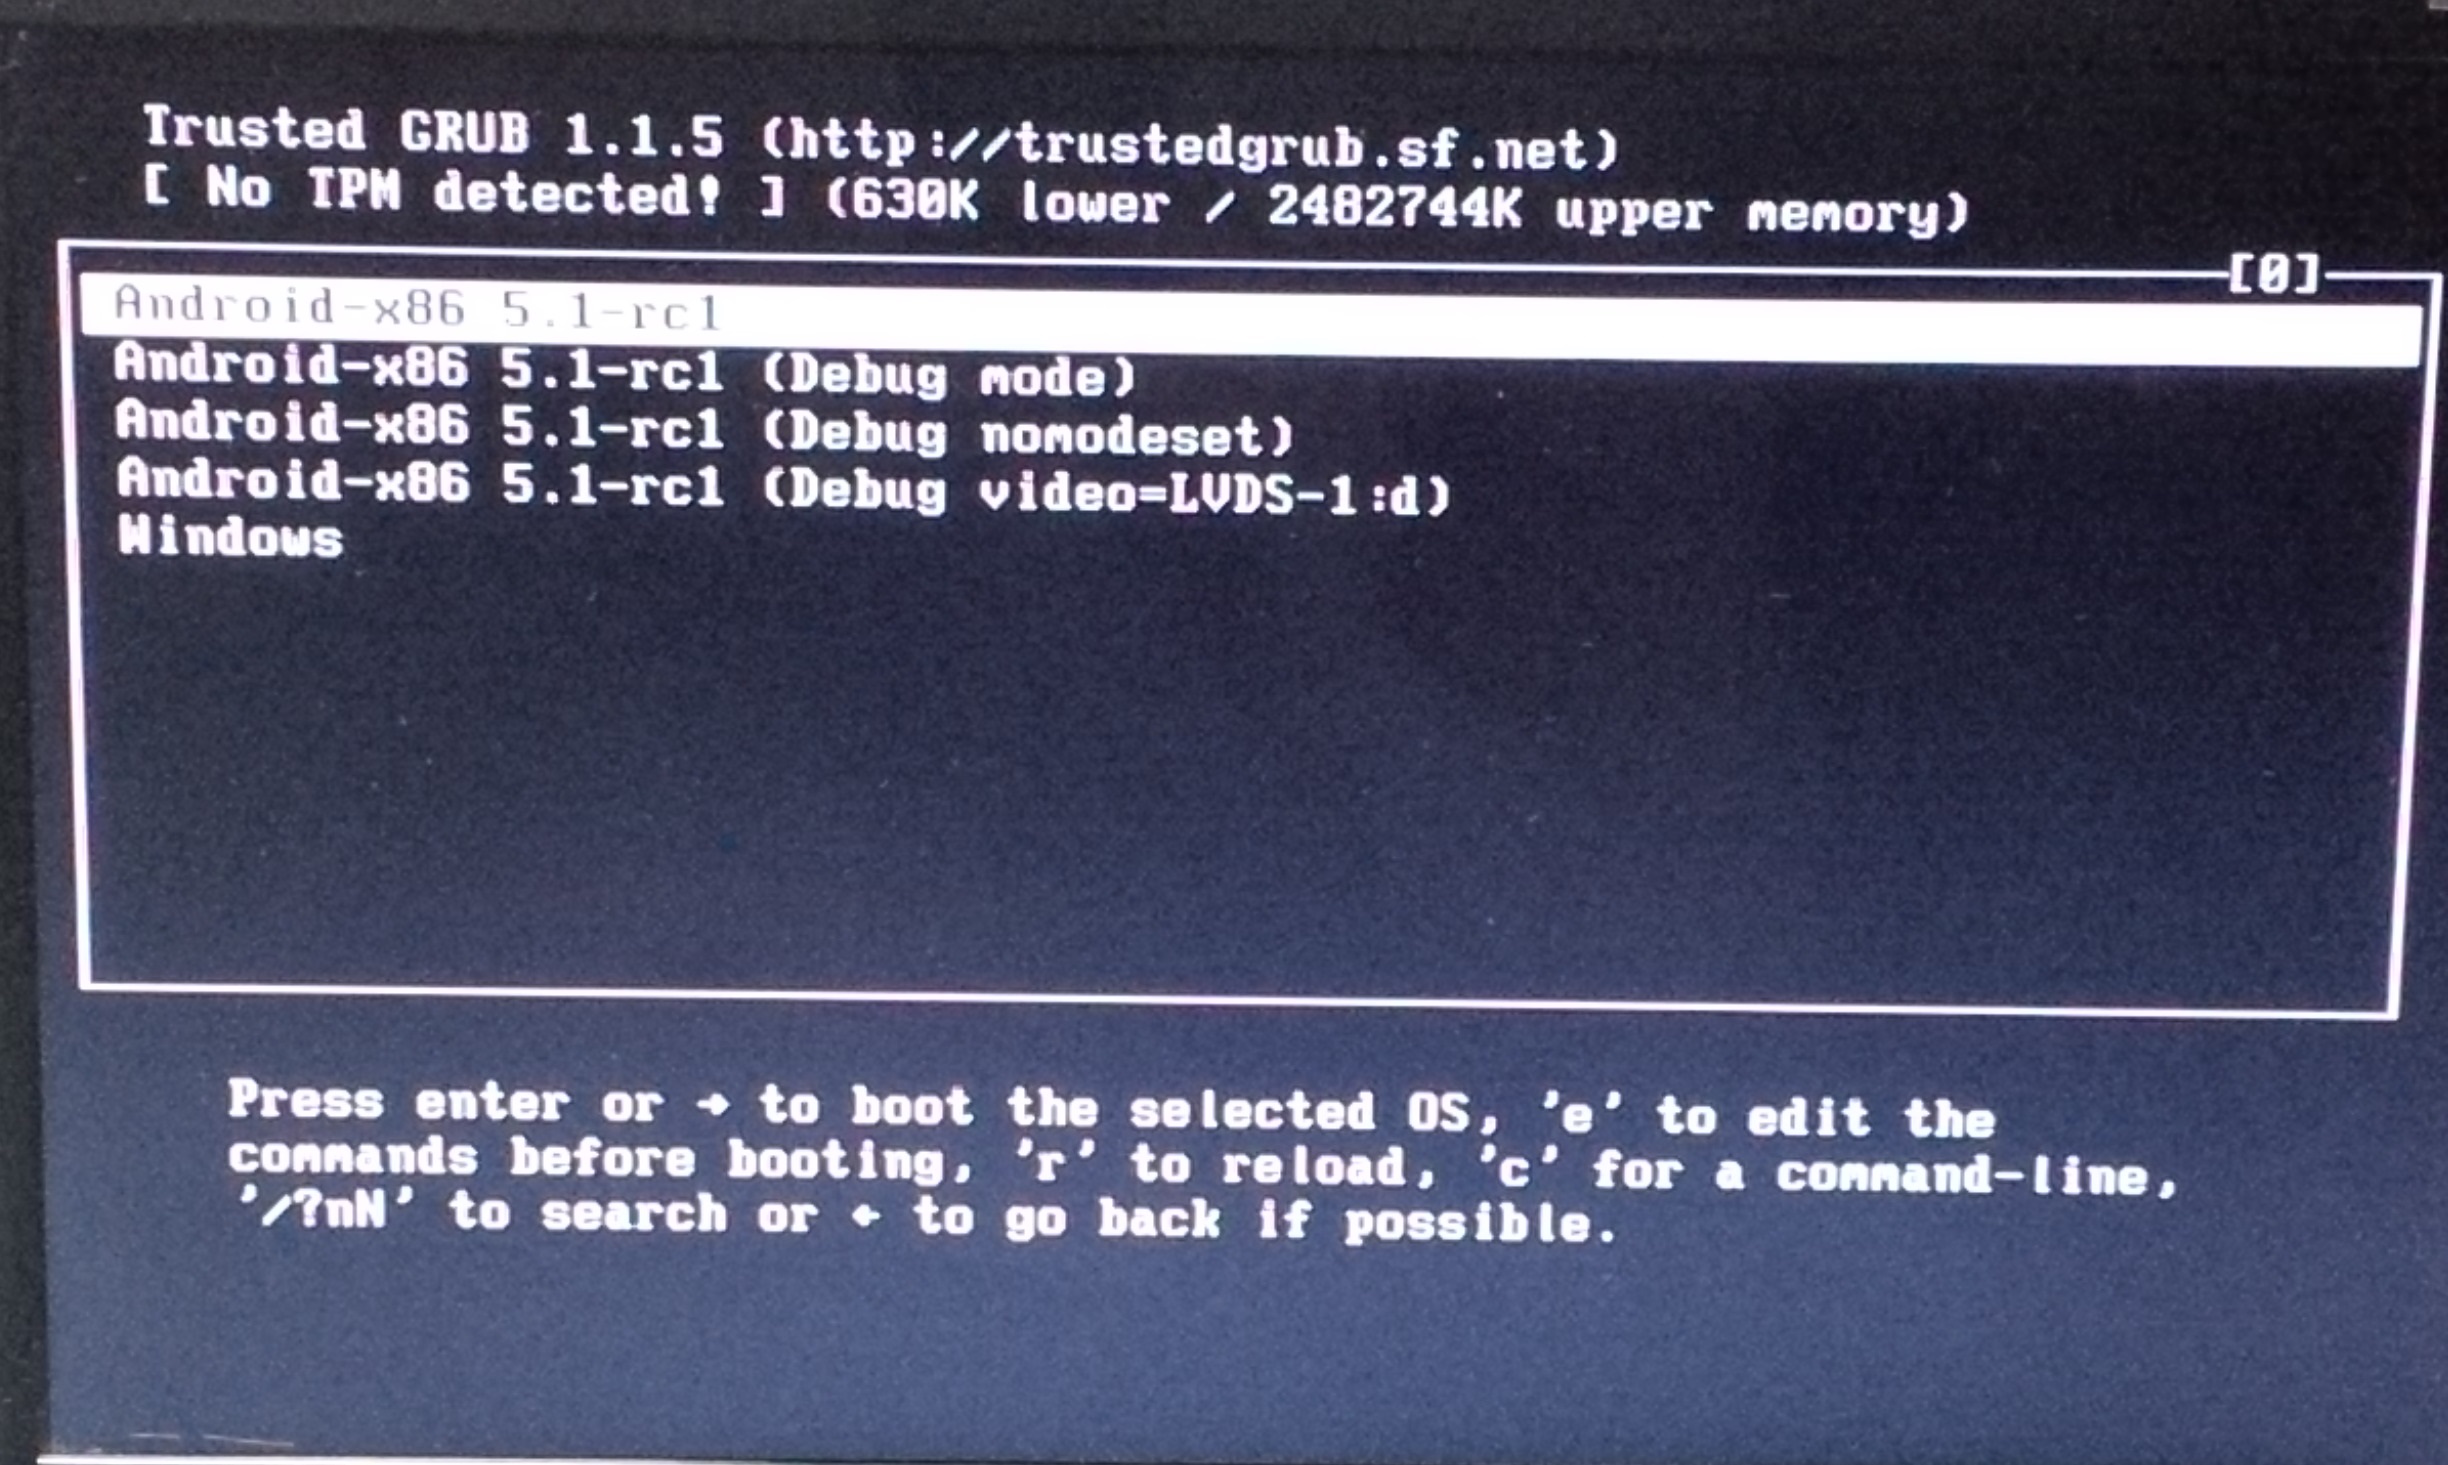
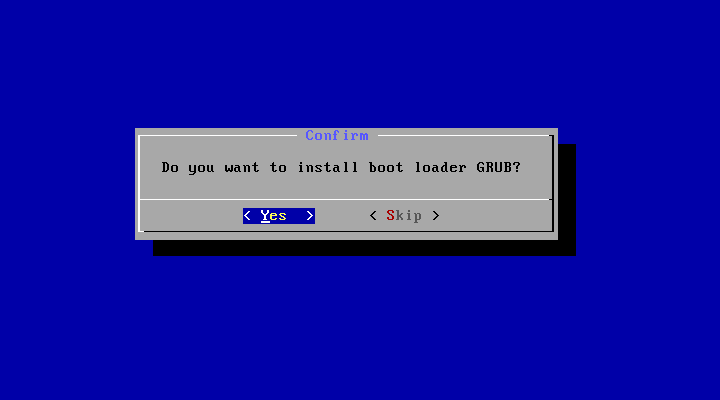
- The next window will ask you to install the GRUB boot manager. If it is you do not have with other Linux-system, you can safely choose «Yes». Then the next time you turn on the laptop display screen with startup options all installed OS. It is worth noting that Windows properly recognized. If you have already installed GRUB, you can select «Skip», and then add /grub/menu.lst Android in the list in the other OS. In both cases, you can choose to install GRUB.
-
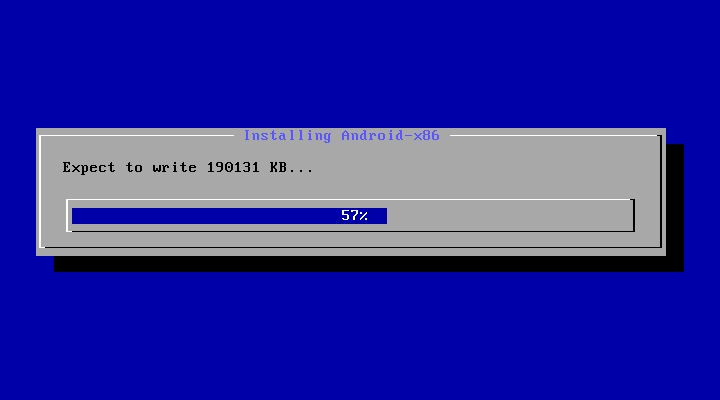
- After the installation is started. At the end of the installer will offer to run once installed Android or reboot the system. If you choose GRUB installation, then after the laptop has to bring something like this.
- Select the first item, and then begin the launch of installed Android.
- Then you have to go through the normal operation faced by each buyer of a new device on Android: the installation language, Google account setup, connect to Wi-Fi and so on. There is no big deal.
- After all of this in front of you must stand your Android desktop. Voila, a mobile operating system is running on your laptop.

How to install Android x86 6.0 Marshmallow on a virtual machine VirtualBox?
If you do not want to install Android x86 on a computer as a complete system, but would like to try it on a virtual machine, then you have another guide.
- Create a new virtual machine in VirtualBox. Select the type of Linux, Linux version 2.x / 3.x / 4.x (32 or 64 bit), depending on your PC. Also, create a virtual partition larger than 2 GB.
- After you create the machine in its settings, downloaded, connect your Android x86 image. This can be done in the «Media» section.
- Start the virtual machine. If everything is set correctly, then you will be presented with a screen with four points. Select the lowest — «Installation». But you can also try a Live CD without installation.
- The chapter selection menu. The procedure is: Create / Modify partitions → Do you want to use GPT (no) → New → Primary → (you can choose the volume of the section) Enter → Bootable → Write (yes + enter) → Quit.
- Choose the partition that was created (VBOX HARDDISK). It will be the first item in the menu. The filesystem — ext4.
- Are you sure to format this partition? → Yes
- Do you want to install boot loader GRUB? → Yes
- Do you want to install EFI GRUB2? → Skip
- Do you want to install / system directory as read-write? → Yes
- The system is installed, select the item Reboot.
- After you restart the virtual machine you will see GRUB boot loader. To run Android, select the top-most item in its menu. Do not touch anything and the system will load automatically.
Voila! You can now use Android in a virtual machine.


I want to add the following to «How to install Android x86 6.0 Marshmallow on a virtual machine VirtualBox?»: 10. The system is installed, close the virtual machine window. Go to settings and to «Media» section and remove the Android x86 iso file as «Controller: IDE». (Otherwise it would not begin with GRUB boot loader)