«Fail to connect to camera service»: this error message is displayed when there is a problem with access to the Android-device camera — smartphone or tablet. More and more people are reporting that they have faced with this error. The difficulty is that a single solution to the problem does not exist, because it can be equally likely to knit both the software and the hardware of the device. Let’s try to understand what is happening and to find affordable ways to solve the problem yourself.
1. Available methods
A) Restart the device
Users report, the camera starts to work after a reboot Android-devices. Sometimes you have to restart the gadget several times to achieve the desired result. In any case, it makes sense to try this simple way — switch off and back on your smartphone or tablet.
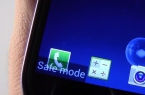
B) Restart in Safe Mode
- Turn off the device.
- Hold down the power button for a few seconds to as long as not to turn off the menu.
- Confirm that you want to reboot the device in safe mode.
- When you start in safe mode, turn on the system camera app. Look at some photos, and then quit the application.
- Turn it on again and see if it works.
If the camera works fine in safe mode, you narrowed the search for the causes of the error. The problem is in the third-party applications conflict with the system software. It is because of them, you can not connect to the camera.
C) Removing conflicting third-party applications
Try to remove the third-party applications that are relevant to the camera. This application, which in the course of their work may take pictures. For example: Snapchat, Whatsapp, etc. Probably on your smartphone or tablet, you find the program with which you can take photos directly from the app and share them. Remove these programs sequentially, one at a time, checking after each removal, if the error has disappeared. If you are unable to connect to the camera, you find conflicting with the system third-party software application.
D) Use third-side camera application
If the system application is the only program that has access to the camera on your Android-device, and you got the message «Fail to connect to camera service» try to work with it with the help of third-party applications. Google Play store is represented by many suitable for this purpose programs. Please use the search function and find the application in the category of «Camera». Stop your choice on one of the most popular applications — such as: Candy Camera, Open Camera, Camera 360, Camera MX or Camera for Android. Download and install the app, launch it.
2. Methods of average level of complexity
These are standard steps that can be done when the application displays an error message «Fail to connect to camera service». Try to use all of them – it should help.
A) Cache and data clearing
- Go to «Settings» of Android-devices;
- Select the «Applications»;
- Locate the camera application, and select it;
- In the application menu, click «Empty Cache» and «Clear data» confirm their validity;
- Restart the device, or forcibly stop the camera app (disable / enable) before another attempt to launch the camera
B) Uninstall and reinstall the updates
Go to the same settings as the camera application, as shown above. If it is possible to remove the update, then do it. But remember that you should not use older versions of the application, so you have to visit the Play Market, to update the camera application again.
C) Check the access rights (only for Android Marshmallow)
Android Marshmallow has a personalized system to enable access to key applications. You must confirm that your camera app has permission to access the camera. Usually, if the necessary authorization is missing, it is requested during application startup.
Go to «Settings» -> «Applications» -> «Camera».
Click on the «Permissions».
Make sure the slider to «Camera Resolution» is shifted to the right. You can turn it off and on again.
3. Methods of error correction for advanced users
А) Cache clearing
This action allows you to clear the device from the system time data — obsolete and only cluttering memory. This option is activated in Recovery Mode, which becomes available after rebooting the phone via the bootloader.
To clean the cache, do the following:
- Turn off the Android-powered device;
- Hold both volume buttons and the power to run the phone — you will see the image of Android robot;
- Perform navigation using the volume buttons, go to the Recovery mode mode;
- Locate the line of options, offering clean cache using the volume buttons and the power, clean.
After clearing the cache is successfully completed, restart your phone and try to start the camera application again. Please note that in your Android-device can be some combination of buttons to access the maintenance mode and restore.
B) Resetting to factory settings
Reset is the most drastic way to solve problems, as entails the total loss of data. But if no other methods do not help, you use it you just have to. However, the data will save the backup, and re-configure the device only to consolidate the skills to work with Android-devices.
Method 1: From restore menu
- Turn off your phone or tablet;
- Hold down both buttons «Volume -» and «Power» to restart the device (you’ll see the Android robot);
- Select the option that offers to return to the factory settings (Factory or Factory Reset), press the power button to confirm.
Method 2: From system settings
- Go to «Settings» Android.
- In the «Advanced» option, find the «Backup & reset».
- Click on the «Factory data reset».
- Confirm your action


![Error retrieving information from server [RH-01]](https://techfaqs.org/wp-content/uploads/2016/02/Cara-Mengatasi-Google-Play-Store-Error-RH-01-145x95.jpg)